WavelengthPro Version 2.0 Release Notes

*scroll down for release notes*

This is WavelengthPro, software for full-spectrum and multi-spectral photo editing. The first video shows a demo of the original version including the Kodak Ektachrome IR film Emulator, Channel Mixer and pseudo colour-mapping. It’s an example of some ways to merge infrared, visible & ultraviolet images together:

This video (and this blog post) shows multiple ways someone might edit ultraviolet images, including Luminance Mapping:

Then finally here is a start to finish edit of an ultraviolet image to apply the ‘Gold UV’ effect:


Release Notes

Fixes of V1.2 Issues:

  • Removed pop-up welcome message
  • Added default settings

New Features Added:

  • Colour-Space Mixer
  • Colour Purity Tool
  • Cloud-Balancer
  • General editing of images (hue shift/brightness/contrast/invert/etc)
  • General loading of images (non-spectral)
  • ‘Drop to Pool’ functionality for all tools
  • Drag and Drop functionality for loading images
  • Custom greyscale in Multi-Channel Mixer
  • Advanced settings to edit config file directly
  • About WLP menu
  • Examples menu with links
  • Scale Pool

Upgrades:

  • Three image pools (Spectral, Created & General)
  • Settings now in wlpConfig.ini instead of text file
  • More basic settings options
  • More greyscale options in Multi-Channel Mixer
  • 3DLUT for Lab & LCHab colour-spaces
Luminance Mapping: UV and Thermal

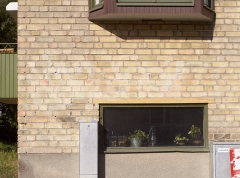
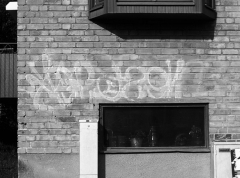
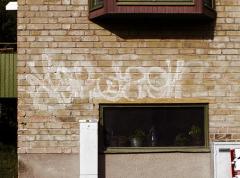
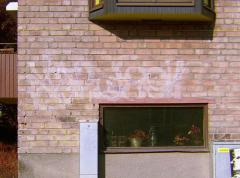
This is a very simple function of WavelengthPro, using the luminance of one image and the hue/saturation of another. All it does is convert from RGB-space to HSL-space then use the L value (lightness) of a different image. In the table below I use a visible light image and an ultraviolet image (I got them from here) and map them in two ways. The first is not a Luminance map, but a GBU map the next is a luminance map which keeps the colours of the visible light and shows them at the lightness of the ultraviolet image.
Wall - VIS Wall - UV
Visible image: can’t see the graffiti well. Ultraviolet image: shows up the graffiti well.
Wall - GBU Wall VIS at UV intensity
GBU map: quite a nice colour palette and shows the graffiti quite well. Luminance map: has a “Human hue” whilst showing up the graffiti really well.

It is great for showing the ultraviolet characteristics of light whilst keeping the ‘true-colour’ feel that we’ve evolved to love. This idea isn’t new though, nightvision sometimes incorporates visible and thermal bands fused together and computer vision sometimes needs more than visible colour data to interpret a scene. One (less scientific) use is to make thermal imaging look a bit more lovely. Below is a visible image, thermal image and the Luminance map (I got them from here):

hand_in_bag hand_in_bagtherm hand_in_bag WITS map

Full Spectrum Photography: Mapping

This post shows three examples of full spectrum mapping methods for multispectral photography. I’ve used some quick shots I took inbetween rain clouds so I apologise for the poor quality – especially the infrared image. All shots taken on a converted D70.

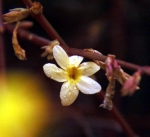
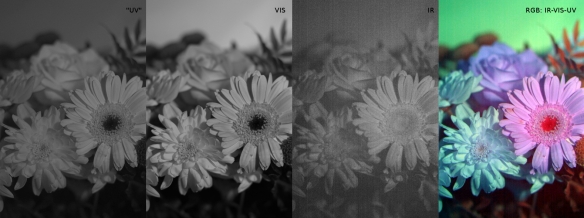
Infrared (720nm filter)small flower - IR Visible light (Hoya cut filter)small flower - VIS Ultraviolet (Baader-U filter)small flower - UV

The only map I see often is the classic 3to3 map. The characteristics are so that vegetation stands out in a very prominent red, nectar guides are clear cut and clear skies are a strong blue. The next map is weighted, roughly, 5to3 on the proportional spectrum each [I,R,G,B,U] component covers as wavelengths. The output shows the nectar guide enough for it to be noticeable, but clearly less so. The last map is my favourite so far, it is a 5to3 map that distributes the [I,R,G,B,U] in equal proportions. It dulls the bright red vegetation caused by infrared in the red channel and shows the nectar guide a little better than the previous map.

Map Type Channels & Output

Classic IR-VIS-UV
R: IR
G: VIS
B: UV
RGB colour map - IVU flower - IVU

Proportional IRGBU
R: (IR + IR + (IR * 0.33)) * 0.42
G: ((IR * 0.66) + R + (G * 0.66)) * 0.42
B: (UV + B + (G * 0.33)) * 0.42
RGB colour map - Proportional Proportional Wavelength Distribution

Equal IRGBU
R: (IR + (R * 0.66)) * 0.60
G: ((R * 0.33) + G + (B * 0.33)) * 0.60
B: (UV + (B * 0.66)) * 0.60
RGB colour map - Equal flower - IRGBU

Testing Infrared Software

This post is to show one of the features of WavelengthPro, some photography software I’m writing at the moment. It’s in early stages at the moment, I hope to add a lot more.

Channel Map Templates
I plan on having a basic and advanced way of mixing channels, so far I’ve done the basic version where you choose template maps. The advanced version will use percent sliders of every channel for every channel just like in Photoshop or GIMP etc. Below is a table showing the three starting images (all taken on a full-spec D70 using 720nm, Hoya UV/IR cut and Baader-U filters) and some of the possible mixtures using the program.

InfraredPan IR VisiblePan VIS UltravioletPan UV
Output image: Mapping information: Applying Auto-WB:
EIR building

IRG 3to3 map

[R:ir, G:r, B:g]

gEIR building
Equal split IRGB building

IRGB 4to3 map

[R:ir+(r*0.33), G:(r*0.66)+(g*0.66), B:(g*0.33)+b] * 0.75

gBoxsplit IRGB building
IRGB building

IRGB 4to3 map

[R:ir, G:(r+g)/2, B:b]

gIRGB building
IR-VIS-UV building

IR-VIS-UV 3to3 map

[R:ir, G:vis, B:uv]

gIR-VIS-UV building
IRGBU building

IRGBU 5to3 map

[R:(ir+r)/2, G:g, B:(b+uv)/2]

gIRGBU building
Boxsplit IRGBU building

IRGBU 5to3 map

[R:ir+(r*0.66), G:(r*0.33)+g+(b*0.33), B:(b*0.66) + uv] * 0.60

gBoxsplit IRGBU building
GBU building

GBU 3to3 map

[R:g, G:b, B:uv]

gGBU building
IR-UV building

IR/UV 2to3 map

[R:ir, G:(ir+uv)/2, B:uv]

gIR-UV building

Almost UV Photography

For ages I have wanted to do full-spectrum photography, which captures light from Infrared (IR) all the way to ultraviolet (UV), but the UV aspect of it is bloody expensive! DSLR sensors, both CCD and CMOS, capture light slightly outside the visible spectrum (VIS) but use things like hot mirrors and UV filters to narrow the band closer to 390-700nm. The sensors use channeling methods like a Bayer filter to give us the very useful RGB channels, in this post we will work with extra channels for IR and UV.

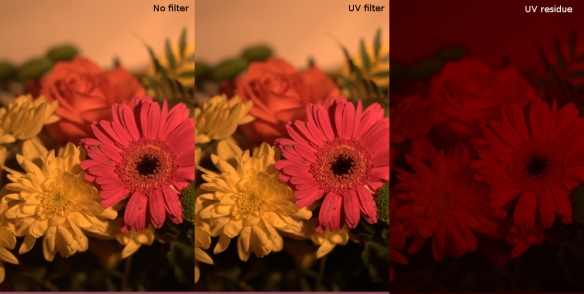
I am always looking for cheap alternatives for UV and I thought I’d test out a bit of a long shot – using a UV filter to maths my way to a UV image. To do this I bought a daylight simulating bulb that emits UVA (400-315nm) and some flowers from the local gas station. It’s a simple idea, the extra light that the UV filter blocks must be UV light so if we subtract all the other light we are left with UV.

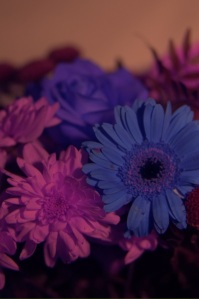
No Filter – UV Filter = UV ResidueFlowersG-B-U RGB mapI subtracted each colour separately for each pixel: [r1-r2, g1-g2, b1-b2], it was rather red so I used the red channel for the new R,G and B making a brighter grayscaled image (see below). Then I used that new “UV” image along with the colour image to map channels [GBU to RGB] like the images Infrachrome makes using this technique. For infrared and ultraviolet he uses an adapted camera specifically for full-spectrum, infact he uses two in a fantastical and magical set up. Unfortunately mine didn’t work very well, my first guess was that the lower range of blue light being reflected as there is no sign of a nectar guide. But after consulting a pro UV photographer I was told it is due to infrared-leakage.

Wideband FlowersI thought I’d do a full spectrum map whilst I had the camera set up so I put on a 950nm IR pass filter and took another shot. In the above image the far right is the channel map of the other three.